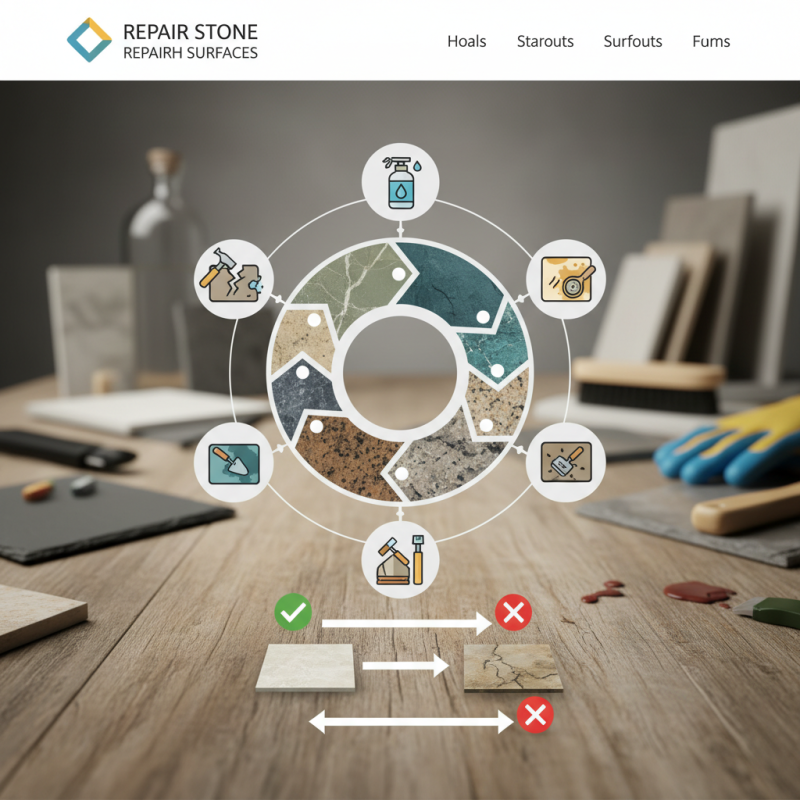
Maintaining stone surfaces can be a challenge. They are beautiful but often prone to damage. In this Stone Surface Repair Tips Guide, we will explore practical solutions for common issues. From scratches to stains, each problem requires a specific approach.
Many homeowners attempt repairs themselves. While DIY can save money, it can also lead to frustration. An improper technique might worsen the damage. For instance, using harsh chemicals can erode the stone. Understanding the right methods is essential for effective repairs.
Investing time in proper techniques is worth it. Repairing a stone surface correctly enhances its durability and appearance. Our guide offers insights from experienced professionals. Each tip is designed to help you navigate the complexities of stone restoration. Reflecting on past mistakes can turn challenges into learning opportunities.
Natural stone surfaces include various types, each with distinct characteristics. Marble is elegant but porous, making it prone to staining. Granite, on the other hand, is durable and scratch-resistant. Limestone offers a softer aesthetic but may require more maintenance due to its susceptibility to acids. Understanding these differences is crucial for effective repair.
When repairing stone surfaces, it’s essential to match the repair method with the stone type. For instance, using an epoxy filler on granite may not blend well due to color variations. Equally important is assessing the initial damage. Cracks in limestone can be filled differently than chips in marble. Each approach requires careful consideration to achieve a seamless repair.
Inadequate preparation can hinder repair efforts. Simply cleaning the surface may not suffice. If the stone absorbs moisture, it could lead to further damage. Ensure the stone is completely dry before commencing repairs. Each type of stone has its nuances, which makes attention to detail vital for successful restoration.
Stone surfaces are prized for their beauty and durability, but they often face issues. Cracks, stains, and scratches are common problems that homeowners encounter. Damage can arise from various factors, including heavy foot traffic, spills, and improper cleaning methods. According to a report by the Natural Stone Institute, more than 60% of stone surface failures are due to improper care.
Identifying these issues early can save time and money. Look for discoloration or dull spots, as these often indicate staining. Scratches can be examined by running your finger over the surface; rough areas signal potential damage. Regular inspections are crucial. Granites may chip around edges, while softer stones like marble show wear more rapidly. A recent study noted that 40% of stone surface owners neglect routine maintenance.
Addressing damage promptly is vital. For instance, minor cracks can be filled with epoxy, restoring the surface’s integrity. However, if the issue is severe, professional repair may be necessary. It's important to weigh the cost of DIY solutions against expert help. Improper fixes can worsen damage. A practical approach includes documenting issues and researching effective repair methods, ensuring you choose the right path for your stone surfaces.
| Common Issues | Symptoms | Repair Tips | Preventive Measures |
|---|---|---|---|
| Cracks | Visible fissures or splits in the stone surface. | Use epoxy or specialized stone filler to seal the cracks. | Regular sealing and avoiding heavy impacts. |
| Stains | Discoloration from spills or environmental factors. | Use a poultice or stone cleaner to lift stains. | Immediate cleaning of spills and using coasters. |
| Etching | Chemical damage causing dull spots or marks. | Polish the area with stone polish and buffing pads. | Using pH-neutral cleaners and avoiding acidic substances. |
| Chips | Small pieces missing from the surface or edges. | Use color-matched epoxy to fill in chips. | Handle items carefully and avoid dragging sharp objects. |
| Scratches | Visible lines or marks from abrasive materials. | Buff out scratches with a fine polishing compound. | Use mats or pads under heavy items to prevent scratching. |
When preparing stone surfaces for repair, cleaning is crucial. Use a soft brush and mild detergent to remove dirt. Avoid harsh chemicals that can damage the stone. Rinse thoroughly with clean water.
Tips: Always test cleaning solutions on a small area first. This prevents potential discoloration.
Next, assess the damage on the stone. Look for cracks, chips, or dull spots. Document these areas for reference. Use a putty knife to clear out loose material from cracks. This ensures proper adhesive bond later.
Tips: Don’t rush this step. Proper preparation can make or break your repair efforts. Pay attention to even the smallest imperfections.
Repairing cracks and chips in stone surfaces can seem daunting. However, with the right techniques, it becomes manageable. Start by assessing the damage. Identify the type of stone and its finish. This ensures the right repair materials are used. For small chips, epoxy or adhesive compounds work well. Apply these carefully to fill the damaged area. Make sure to smooth it out evenly. A putty knife can help achieve a polished look.
For larger cracks, more work is necessary. Clean the area thoroughly to remove dust and debris. This ensures strong adhesion for the repair material. Use a stone filler, which blends with the surface. Apply it slowly and build it up if needed. After drying, use a fine-grit sandpaper to level the surface. It's key to avoid over-sanding, which can create more issues. Take breaks to step back and check your progress.
Take your time with each step. Rushing through repairs can lead to mistakes. Revisit areas that didn't meet your expectations. Learning from each experience helps improve your technique. With practice, the results will become more satisfactory. Don't shy away from trying different methods for unique stone types. Your skills will develop over time.
Repairing stone surfaces requires precision and care. One key aspect to consider is sealing these surfaces after repairs. Sealing not only enhances appearance but also adds a layer of protection against stains and moisture. A quality sealant keeps the stone looking new and can save you future repair costs.
When applying a sealant, ensure the surface is completely dry and clean. Dust or moisture can hinder adhesion. After applying, it’s essential to let it cure as per the manufacturer’s instructions. This step is crucial; rushing this process often leads to peeling and bubbling. It's a common mistake, one that can diminish your hard work.
Maintenance plays a critical role post-repair. Regular cleaning with a pH-neutral cleaner helps maintain the seal. Avoid acidic cleaners, which can erode both sealant and stone. Resealing every one to three years is recommended for high-traffic areas.
Repair jobs can look great initially, but neglecting maintenance can lead to deterioration. Remember, the goal is not just repair but sustainability.
: Cracks, stains, and scratches are frequent issues homeowners face.
Look for discoloration or dull spots, which often indicate staining.
Regular checks can detect damage like chips or scratches early on.
Minor cracks can be filled with epoxy for restoration.
Yes, severe issues often require professional help.
Clean regularly with a pH-neutral cleaner to protect the seal.
Resealing every one to three years is recommended, especially in high-traffic areas.
Rushing the curing process can lead to peeling and bubbling; avoid this.
Acidic cleaners can erode both the stone and the sealant.
Neglecting maintenance can lead to deterioration over time.
The "Stone Surface Repair Tips Guide" provides comprehensive insights into effectively repairing various types of stone surfaces. It begins by highlighting the unique characteristics of different stone materials, which is vital for understanding specific repair needs. The guide also addresses common problems encountered with stone surfaces, such as cracks and chips, along with methods for identifying these issues.
In addition, it offers a detailed step-by-step approach to cleaning and preparing stone for repairs, ensuring a smooth restoration process. Techniques for effectively repairing damage to stone surfaces are thoroughly outlined, emphasizing practical methods. Finally, the guide concludes with essential tips on sealing and maintaining repaired stone surfaces to enhance their longevity and appearance. This holistic approach equips readers with the knowledge needed to tackle their stone repair projects confidently.
Jieda Stone